Categories
PHP Programming

PHP Dark Arts: Multi-Processing (Part 1)

Warning: WP_Syntax::substituteToken(): Argument #1 ($match) must be passed by reference, value given in /var/www/html/wp-content/plugins/wp-syntax/wp-syntax.php on line 380

Note:  Part 2 of this post can be found here.

Of all the glorious programming languages in existence, you’ve chosen to work with PHP.  Okay, maybe you were forced to, but that doesn’t mean you can’t have fun right?  Hmm, fun… What’s fun?  Threading, race conditions, and deadlocks.  Sounds like loads of fun!  But alas, PHP doesn’t have functionality to cover this.  True, but the host operating system does.  We can just fork processes manually like in the good ‘ole days and then ride off into the sunset.  But we shouldn’t do that, it’s wrong.  It’s taking advantage of PHP.  Bah! We’re going to do it anyways.  And FOR THE LOVE OF GOD, do not do this in production code.  If you need multi-threading, use a different language.

Process Control

One of those things that you are bound to learn about if you go through a computer science degree is process control.  Process control usually comes up slowly and then bites you in the ass REALLY hard during operating systems courses.  Thinking about race conditions, deadlocks, and collisions are all part of the game.  And guess what?  When you are writing multi-threaded programs this is exactly the type of thing you will encounter.

When thinking about process control, people often cite some form of a producer-consumer problem.  You have one process (thread) producing information, and another thread consuming it.  For instance, a producer may spit out a stream of integers, and the consumer will, well, consume them.  However, the consumer will terminate itself when it hits a non-integer character.  That’s called out exit condition, and it’s very important.  You have to always remember to have some sort of fool-proof exit condition, otherwise the process is going to hang and go zombie on your.  If your program get’s executed a few thousand times a day, you get a few thousand zombies (process zombie apocalypse!).  So, the import part here is to remember that you need to have exit condtions.

Getting Started

The first step into multi-threading in PHP is making sure your build is compiled with the –enable-pcntl flag set.  If that’s not set, you’re dead in the water.  Otherwise, we can take a look at a simple example.

1
2
3
4
5
6
$processID = pcntl_fork();
if($processID) {
     echo "I'm in the parent process!";
} else {
     echo "I'm in the child process!";
}

Now, a quick explanation.  The pcntl_fork() function takes the current running process and makes a copy of it.  Everything (for practical purposes) is copied into this new child process except the process id(pid) which is changed to something new.  This is where things get a bit weird.  When pcntl_fork() executes, the pid of the child process is returned to the parents thread of execution.  A value of 0(zero) is returned to the child process’ thread of execution.  Since you can differentiate between threads of execution, you can make them do different things with a simple if statement like above.  So what does this program print?

I'm in the parent process!
I'm in the child process!

or

I'm in the child process!
I'm in the parent process!

It can actually go either way here.  It depends entirely on how your operating system decided to schedule the processes.  But remember, the child process is an exact (not entirely true, but let’s go with it) copy of the parent process.  So what happens if we change the code a bit.

1
2
3
4
5
6
7
$processID = pcntl_fork();
if($processID) {
     echo "I'm in the parent process!";
} else {
     echo "I'm in the child process!";
}
echo "End of the line folks.";

Since the last echo statement exists in both parent and child processes, you’ll get:

I'm in the parent process!
End of the line folks.
I'm in the child process!
End of the line folks.

Waiting for the Child

One of the problems that you run in to with writing multi-threaded programs is that the child process can finish before the parent, or the parent can finish before the child.  You just never really know.  So you need a way to wait for processes to finish.  Lucky for us, PHP at least provides this functionality for us.

1
2
3
4
5
6
7
$pid=pcntl_fork();
if($pid) {
     pctnl_waitpid($pid,$status,WUNTRACED);
     echo "In parent process!";
} else {
     echo "In child process!";
}

By using the pcntl_waitpid() function, we can force the parent process to wait for the child process to finish executing.  This is handy for if you have a critical procedure that your child process must complete before the parent can continue.  In our case, the output will always be:

In child process!
In parent process!

Next Time…

That’s all for now, but soon I’ll have The 2nd (and last) part of this article up for your enjoyment.  In that part, we’ll cover some more advanced notions like getting/setting priority, setting alarms, and signal processing.   You should follow me on Twitter and/or become a fan on Facebook to find out when this exciting(?) article comes out.

Categories
Wordpress Development

WordPress Data Validation Functions

As a developer of WordPress plugins or themes, you need to be aware of and use data validation.  What is data validation you ask?  It’s when you make sure that the data you fetched (POST, GET, database call, external source) is the type of data that you expected.  For instance, let’s say you have a user enter a number between 1-10.  They enter the letter ‘A’.  The process of determining whether the input is an integer between 1-10 is data validation.

So what kind of data functionality does WordPress (and PHP in general) offer?  Lots!

  • intval($value) – This will cast any value as an integer.  Particularly useful for casting floating point numbers.
  • absint($value) – Returns the absolute value of a number.  For those of you with no math background, that means it will return a whole number given any floating point number.  (Ex.  absint(3.3) = 3)
  • wp_kses() – This function will strip a string of any HTML tags that are not allowed.  It also makes sure that any HTML entities that are in the string are normal.
  • esc_html($string) – This will escape any HTML characters in a string.  This is handy for storing blogs of HTML in a database.
  • esc_js($string) – Escapes any javascript that it is given.  Mostly this means it escapes single and double quotes.
  • urlencode($string) – This function encodes any string you put in to it as a url-safe value.
  • $wpdb->prepare() – This function is used prepare SQL statements for database inserts.  I wrote an article about using the WPDB class with your plugin that you should check out.
  • validate_file(..) – This  is useful to validate that a file exists, and also to help prevent directory traversal attacks.
  • wp_redirect() – This is the safest was to do redirects.  Instead of using header(Location: ..), this will only allow redirects to white listed domains instead domains.
  • balanceTags($string) – If you’re allowing your users to comment on something with html tags, this function will try to make sure that the tags are balanced.
  • is_email($email) – Validates whether an email address is valid or not.

As you can see, WordPress (and PHP) include a nice array of data validation functions.  Make sure you use them as often as possible, because a large number of web based attacks could be prevented if people validated data.

Categories
Wordpress Development

WordPress Dashboard Widget Tutorial

Historically, I’ve never been a huge fan of the WordPress Dashboard.  Not because I don’t think it’s a good idea, but mostly because I don’t use it.  Before I turned this into a WordPress / PHP development blog, I posted infrequently and never saw the point of having a dashboard view.  Now that I have traffic, and hope to get more (*crosses fingers*), I’m spending a lot of time there.  Since I’m spending so much time on the dashboard, I thought I might make a bit more useful with a widget.

Note:  The full (working) version of this Dashboard Widget is available here.

Reddit RSS WordPress Dashboard Widget

Step 1:  Decide What You’re Going To Create

The first step in this tutorial is deciding what to create.  I’m personally a HUGE fan of Reddit, but often enough I’m unable to read it because I’m busy managing this blog.  So, why not bring Reddit to me?  This tutorial will show you every step of how to create a WordPress Dashboard Widget that displays Reddit’s RSS feed.

Step 2:  Write The Display Code

As most readers here know, WordPress is well on it’s way to being a full-fledged CMS.  As with any good CMS, extending any part should be easy.  It’s no different with the WordPress Dashboard.  Using the wp_add_dashboard_widget function, you can hook into the WordPress Dashboard and drop in your own widgets.  But first, we must write the widget itself.

1
2
3
4
5
6
7
8
9
10
11
12
13
14
15
16
17
18
19
20
21
22
23
24
25
26
27
28
29
30
31
32
33
34
35
36
37
38
39
40
41
42
function reddit_rss_dashboard_widget_function() {
     $rss = fetch_feed( "http://www.reddit.com/.rss" );
 
     if ( is_wp_error($rss) ) {
          if ( is_admin() || current_user_can('manage_options') ) {
               echo '<p>';
               printf(__('<strong>RSS Error</strong>: %s'), $rss->get_error_message());
               echo '</p>';
          }
     return;
}
 
if ( !$rss->get_item_quantity() ) {
     echo '<p>Apparently, there is nothing happening on Reddit!</p>';
     $rss->__destruct();
     unset($rss);
     return;
}
 
echo "<ul>\n";
 
if ( !isset($items) )
     $items = 10;
 
     foreach ( $rss->get_items(0, $items) as $item ) {
          $publisher = '';
          $site_link = '';
          $link = '';
          $content = '';
          $date = '';
          $link = esc_url( strip_tags( $item->get_link() ) );
 
          $content = $item->get_content();
          $content = wp_html_excerpt($content, 250) . ' ...';
 
         echo "<li><a href='$link'>$link</a> - $content</li>\n";
}
 
echo "</ul>\n";
$rss->__destruct();
unset($rss);
}

Most of the above code is pretty easy to follow.  But here’s  breakdown of what happens if you’re a bit confused.

  1. We use the fetch_feed function to get the RSS feed from the supplied URL.  In this case, it’s Reddit’s RSS feed.
  2. Check to see if there have been any errors (is_wp_error).
  3. Check to see if there was anything on the feed. ($rss->get_item_quantity).
  4. Loop through the fee printing out list items.

Step 3:  Add The Widget To The Dashboard

In this step, you need to call wp_add_dashboard_widget from a function.

1
2
3
function reddit_rss_add_dashboard_widget() {
     wp_add_dashboard_widget('reddit_rss_dashboard_widget', 'Reddit RSS', 'reddit_rss_dashboard_widget_function');
}

The first argument in this function is the unique id that you give your widget.  The second argument is the widget’s name.  And the 3rd argument is the display function (which we just wrote).

Step 4:  Initialize Your Widget

The fourth and final step to creating a WordPress Dashboard Widget is to use the add_action function to add it to the setup.

1
add_action('wp_dashboard_setup', 'reddit_rss_add_dashboard_widget');

Step 5:  Clean Up

Once you have everything written, save it all in a file called reddit_dashboard_widget.php.  From there, zip it up and upload it to your WordPress install as a plugin.  Once activated, you’ll have Reddit’s RSS feed as a Dashboard Widget.  It will show up towards the bottom, so you’ll need to re-order it to your liking.

Final Thoughts

As I brought together this dashboard widget as a proof of concept, I got to thinking about how it could be improved.  One way would be to use more Ajax to fetch the updated feed.  Or if the RSS feed doesn’t update frequently enough, we could scrape the page ever n minutes to get updated content.  Also, at the suggestion of a reader, I’m going to start including full (working) examples with each tutorial.  Enjoy!

Download the WordPress Reddit Dashboard Widget Here.

Categories
PHP Programming Wordpress Development

WordPress Shortcode API Tutorial

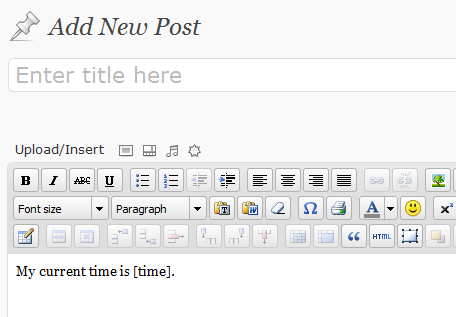
One neat feature of WordPress plugins is shortcode.  Shortcode enables a user to put something like “[myplugin]” in their posts or pages and have it display content from their plugin.  Making WordPress shortcode work for you isn’t terribly difficult, but without some help it can be confusing.  In this tutorial, I’ll show you how to use shortcode in your plugins.

Wordpress Shortcode API Tutorial

Shortcode Example

Let’s say you want to print out the current time anywhere in your post where you put “[time]”.  Easy enough!  Open up your theme’s functions.php and enter the following.

function time_func($atts) {
     $thetime = time();
     return date("g:i A",$thetime);
}
add_shortcode('time', 'time_func');

So now, “[time]” will be replaced with the current server time formatted like hour:minute AM/PM.  But what if you aren’t sure what format you want the time to come out in?  Well, you just need to add an attribute.  I’m going to be using PHP’s date() function formatting in this example.

function time_func($atts) {
     extract(shortcode_atts(array(
          'timeFormat' =&gt; 'g:i A'
          ), $atts));
     $thetime = time();
     return date($timeFormat, $thetime);
}
add_shortcode('time', 'time_func');

What the above code does is add the possibility of an attribute to your shortcode.  So you could use it like “[time timeFormat=’d.m.Y’]”, which return today’s date.  In the extract function, you can specify the default value (which I set as hour:minute AM/PM).  You can add as many attributes as you need to your shortcode.

For more information, please see the WordPress Shortcode API.

Categories
Other Programming

Load Javascript Dynamically With Lazy Load

One of the blessings (or plagues) or the “Web 2.0” revolution is heavy use of Javascript.  Used properly, Javascript can enhance your user experience to nearly the level of a desktop application.  Used poorly, and you’re browser is going to crash and burn.  But this post isn’t about using Javascript, it’s about loading it.

You see, a large amount of web developers don’t think about how their web page is loaded.  They think that no matter where scripts are included, its going to take the same time to load.  Actually, this is true.  What we’re after is an apparent decrease in load time.  When you include Javascript files at the top of your HTML document, as soon as the browser encounters the Javascript it will load and execute it.  The problem here is that loading a Javascript file is a blocking call in most web browsers.  What does this mean to you?  It means that while the Javascript is loading, the rest of your page isn’t.  The apparent page load time has increased.

To get around this problem, some web developers have started including their scripts as the last element in the <body> tag.  Done this way, your entire page loads on to the screen before the Javascript starts to load.  The apparent page load time as decreased.  Yes, the script will still take the same time to download and execute, but now people will see content almost immediately.

But why should you include some Javascript files if you aren’t sure the user is going to make use of them?  Enter Lazy Load.  Lazy Load allows you to easily include Javascript or CSS files on the fly.  This is especially helpful when you have large files that need to be loaded.  For instance, a sweet new carousel for your site.  It’s probably pretty large, and the user is going to have to wait for it anyways.  Using Lazy Load you can decrease your site’s apparent and actual load time.  It’s also small (~800 bytes minified), so you won’t need to worry about the footprint.  Oh, it’s really easy too…

LazyLoad.js('http://example.com/foo.js', function () {
     alert('foo.js has been loaded');
});
Categories
Wordpress Development

WordPress 3.1 Features

While the release of WordPress 3.1 is still a few months away, a lot of people have begun to wonder what new features might be added and what bugs may be fixed.  The WordPress developers have finally held a meeting and came up with a plan of what they would like to include in the 3.1 release.

Features

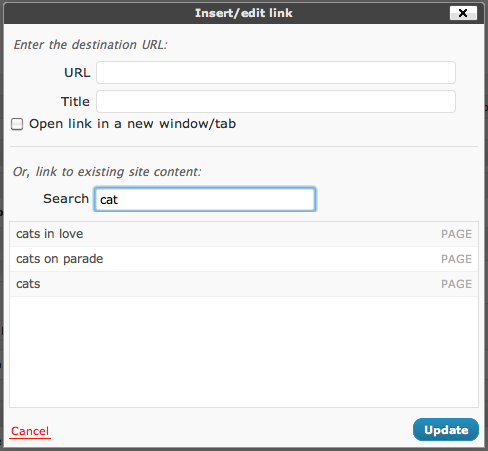
  • Internal Linking  – This is by far the most exciting feature to get in to WordPress 3.1.  What this will allow you to do is easily link to pages within your site.  Instead of having to go to the page, copy the URL, and then paste it into an external link, you’ll be able to click the “Internal Link” button and choose from your posts.
  • Bug Fixes – As always, there will be numerous bug fixes included in this release of WordPress.
  • Post Templates – In many a CMS, you are able to create a bunch of different templates by which you can display your content.  WordPress has started down this path a little bit with custom post types, but if you wanted to display a normal post multiple ways you were sort of out of luck.  In WordPress 3.1, designers and developers will be able to create multiple templates and users will be able to choose how their post is displayed.
  • Theme Admin UI – This upgraded will make the way you browse and administer your WordPress themes much easier.  The current system is a bit clunky, and they hope to do away with it completely and replace it with an improved version.
  • Ajax Admin – It’s no secret that WordPress doesn’t use Ajax much on the back end.  It looks like they developers have finally decided to change this with 3.1.  This update should hopefully smooth out the pagination when browsing your posts in the admin.  It should also provide advanced search and sorting functionality.
  • The Admin Bar – WordPress.com users have a neat feature called the “Admin Bar”.  What this does is connect the back and front end of the site through an easy to use bar that appears at the top of the screen for logged in users.  From the discussions, it looks like this may have to be enabled (similar to featured images), but it is still a welcome feature to most.

Release Schedule

  • October 15, 2010 – Feature freeze.
  • November 15, 2010 – Beta period starts.
  • December 15,2010 – Release.

Wordpress 3.1 Features

Categories
Wordpress Development

Securing Your WordPress Plugin: Nonces

So you’ve created an epic contact form plugin for your WordPress install.  It seems secure enough.  You’re validating input, checking input types, and doing everything else right.  After it’s been up for a few weeks, you take a look at your database and notice you’ve got a bunch of crap in there.  “How could this happen?!” you scream!

Well, it probably had something to do with a Cross Site Request Forgery (CSRF).  Cross site request forgeries happen when someone starts submitting information to your form’s processing controller from another domain.  This is easy enough to do, because you can set the action field of a form to anything you want.  If you aren’t careful how you process your form, CSRF attacks can be a huge problem.   So how can you secure your plugin against CSRF attacks?  By using a nonce (Number used once).

Nonces are unique identifiers that you can use to make sure your form is coming from the right place.  To use them, you follow three simple steps.

  1. Create the nonce identifier. (wp_create_nonce)
  2. Place the identifier in your form or query string.
  3. Verify that the nonce is correct. (wp_verify_nonce)

In practice, it looks something like this.

1
2
$nonce = wp_create_nonce("my-plugin-nonce");
echo "<a href='controller.php?nonce={$nonce}'>Click here!</a>";

And then in your controller/processor…

1
2
$nonce = $_GET['nonce'];
if(!$wp_verify_nonce($nonce, "my-plugin-nonce")) due("No CSRF for you!");

That’s really all there is to it.  In literally 4 lines of code, you can make your plugin that much more secure.  On a side note, if you are using ajax to submit a form or pull data, you can pass the nonce through as a form field (or as part of the query string), but you’ll need you use a different function to verify it (check_ajax_referer).

1
check_ajax_referer("my-plugin-nonce");

Additional Resources

Categories
PHP Programming

Search PDFs With PHP, MySQL, and PdfToText

Being able to search a PDF is a very useful feature on any web site.  The problem is that there aren’t many languages that give you the tools to do so right out of the box.  PHP is no exception to this.  If you want to search PDF files you’ll need some third-party tools and a little bit of ingenuity.

Pre-requisites

You’ll server will need to have the following configuration.

  • PHP (>=4)
  • MySQL (>=4)
  • Linux (Distro of your choice)

Step 1:  Download PdfToText

PdfToText is a program written in C that will quickly convert the contents of a PDF to text.  We’re going to use it just for that purpose.  You download the file at http://www.foolabs.com/xpdf/download.html.  Once you have downloaded the file, go ahead and place it somewhere in your web site directory and extract it (on most linux systems “tar -xzf [file]” will do the trick).  Once it’s unzipped, you’ll see a program called “pdftotext”, which is what we’re after.

Step 2:  Convert the PDF to Text

As an astute reader, you’ve probably noticed by now that PdfToText is not a PHP file.  So how are we going to use it?  Well, we’re going to use the “backtick” (the ~ [tilda] key) operator.

function convert_to_text($pdf) {
     $output = `./pdftotext {$pdf} temp.txt`;
     return $output
}

The backtick operator will execute any command on the command line, trap it’s output, and return it to the caller.  It’s worth noting that the backtick operator will only return output from standard out.

This is probably the hardest part of this tutorial.  There may be problems with write permissions on the directory, or ownership problems, but if you can get it to work, you’re all set.

Step 3:  Read the Text

Now that the PDF has been converted to a text file, we need to get that information back in to PHP.  To do that, we use the file_get_contents functions.

function get_text() {
     $text = file_get_contents("temp.txt");
     return $text;
}

Step 4:  Store the Data

This part of the tutorial assumes 2 things.  1) That you have a table named pdf_data, and 2) That the table has a column called pdf_contents that is full-text searchable (If you need help setting this sort of thing up, leave a comment).

function store_data() {
     $text = mysql_real_escape_string(get_text());
     $query = "INSERT INTO pdf_data (pdf_contents) VALUES ('{$text}')";
     mysql_query($query);
}

Step 5:  Search the Data

The final step is actually searching the data.  To do that, we’ll use the full-text searching capability of MySQL.

function search_data($term) {
     $term = mysql_real_escape_string($term);
     $query = "SELECT * FROM pdf_data MATCH(pdf_contents) AGAINST ('$term')";
     $result = mysql_query($query);
     while($row = mysql_fetch_array($result)) {
          //Do stuff with returned data.
     }
}

Where “Do stuff with returned data” is, you can do whatever you want.  MySQL is going to return the rows to you in order of relevance (descending).  The most relevant result will be first, followed by the second most, and third most, and so on.

Other Notes

  • PdfToText may or may not be the best way to do this, but it is one of the simplest.  There are a handful of libraries out there for creating PDFs in PHP, but surprisingly few for something as common as reading a PDF.
  • There are binaries and source files available for PdfToText on their web site(here).
  • This tutorial could be expanded a lot.  If you have questions or requests, please ask!